Building a party and teams service in less than a day using Hasura

The following post will explain how you can build a simple party management and team service complete with relationship graph, access control and permissions in less than a day. We’ll be using a tool called Hasura with data stored in a Postgres database.
Scroll down for a TL;DR and for an example code base.

What is Hasura?
Hasura acts almost like an ORM but it’s intended to be used by clients too. It sits on top of your data layer and exposes a set of GraphQL queries, mutations and subscriptions for interfacing with your data. It provides flexible authentication and allows you to build relationships between your tables, even allowing you to introduce remote data sources and schemas.
The task
As a proof of concept, and with some inspiration from a previous Abletech research project by Andrew Pett, Parteams was born. This combines the “Party Role Relationship” pattern with the “Teams” Pattern. We have found both patterns to be extremely useful in a variety of use cases from small systems to enterprise systems.
The “Party Role Relationship” pattern proves really useful in describing Organisation, company structures and the different and complex relationship between Parties.
The “Teams” pattern provides a useful abstraction when controlling access to a particular set of resources by a group of subjects.
“Parteams” provides a hybrid relational graph of data using parties and relationships with some access control permissions built in using the fundamentals of teams and resources.
The entire graph and team structure is scoped by scoping rules at the data access layer, ensuring the authenticated user is within the data structures to obtain access to the underlying data.
The main ideas in “Parteams” are:
- Parties - these are nodes in our relational graph - they can be people or organisations.
- Relationships - these are edges in our relational graph, they can be directed and hold the type of relationship between our parties.
- Teams - these are constructs which group parties and resources together. They contain subjects and resources. The subjects relate to parties, where the subjects are granted access to resources with an access level of read, write or admin. Clients are able to query teams to see if a given subject has access to a particular resource.
Getting started
Setting up Hasura
First step was getting Hasura and our database set up. You could opt to use Hasura Cloud, which is fully-managed, however we have opted to get our environment running locally first and deploy out to our own cloud infrastructure later. We’ve also opted to use Postgres as our database engine, you could choose many of the other options supported by Hasura.
Start by creating a docker-compose file with two containers, one for your graphql-engine, and another for your Postgres instance.
version: '3.6'
services:
 postgres:
   image: postgres:12
   restart: always
   volumes:
   - db_data:/var/lib/postgresql/data
   environment:
     POSTGRES_PASSWORD: postgrespassword
   ports:
     - "5432:5432"
 graphql-engine:
   image: hasura/graphql-engine:v2.3.1
   ports:
   - "8080:8080"
   depends_on:
   - "postgres"
   restart: always
   environment:
     ## postgres database to store Hasura metadata
     HASURA_GRAPHQL_METADATA_DATABASE_URL: postgres://postgres:postgrespassword@postgres:5432/postgres
     ## this env var can be used to add the above postgres database to Hasura as a data source. this can be removed/updated based on your needs
     PG_DATABASE_URL: postgres://postgres:postgrespassword@postgres:5432/postgres
     ## enable the console served by server
     HASURA_GRAPHQL_ENABLE_CONSOLE: "true" # set to "false" to disable console
     ## enable debugging mode. It is recommended to disable this in production
     HASURA_GRAPHQL_DEV_MODE: "true"
     HASURA_GRAPHQL_ENABLED_LOG_TYPES: startup, http-log, webhook-log, websocket-log, query-log
     ## uncomment next line to set an admin secret
     HASURA_GRAPHQL_ADMIN_SECRET: myadminsecretkey
volumes:
 db_data:
docker-compose.yml
For our graphql-engine, we set up the container with some sensible defaults, like enabling the console, some additional nice-to-haves for developing and a super-simple secret.
Connecting up the database
First up, we’ll need to connect our database. The easiest way to do this is via the Hasura console. To start the console, you can run the following commands:
export HASURA_GRAPHQL_ADMIN_SECRET=myadminsecretkey
hasura console
Start the Hasura console
This will run the Hasura console at http://localhost:9695/console. Following this, you’re able to select the “Data” tab, and then “Connect Database”. Give your database a name, select the driver and you can select to connect via environment variable - PG_DATABASE_URL.
Note: this demo assumes you want to start fresh with a PostgreSQL database, you can also connect up another database full of schemas/tables and your own data and see what Hasura has to offer. If you choose to do this, you can leverage as little or as much of what Hasura has to offer, but with your existing schemas, relationships and data.
Setting up our tables
Next step is to create our migrations. We want to create tables, with foreign keys, for our parties, party_types, relationships, relationship_types, teams, resources and subjects.
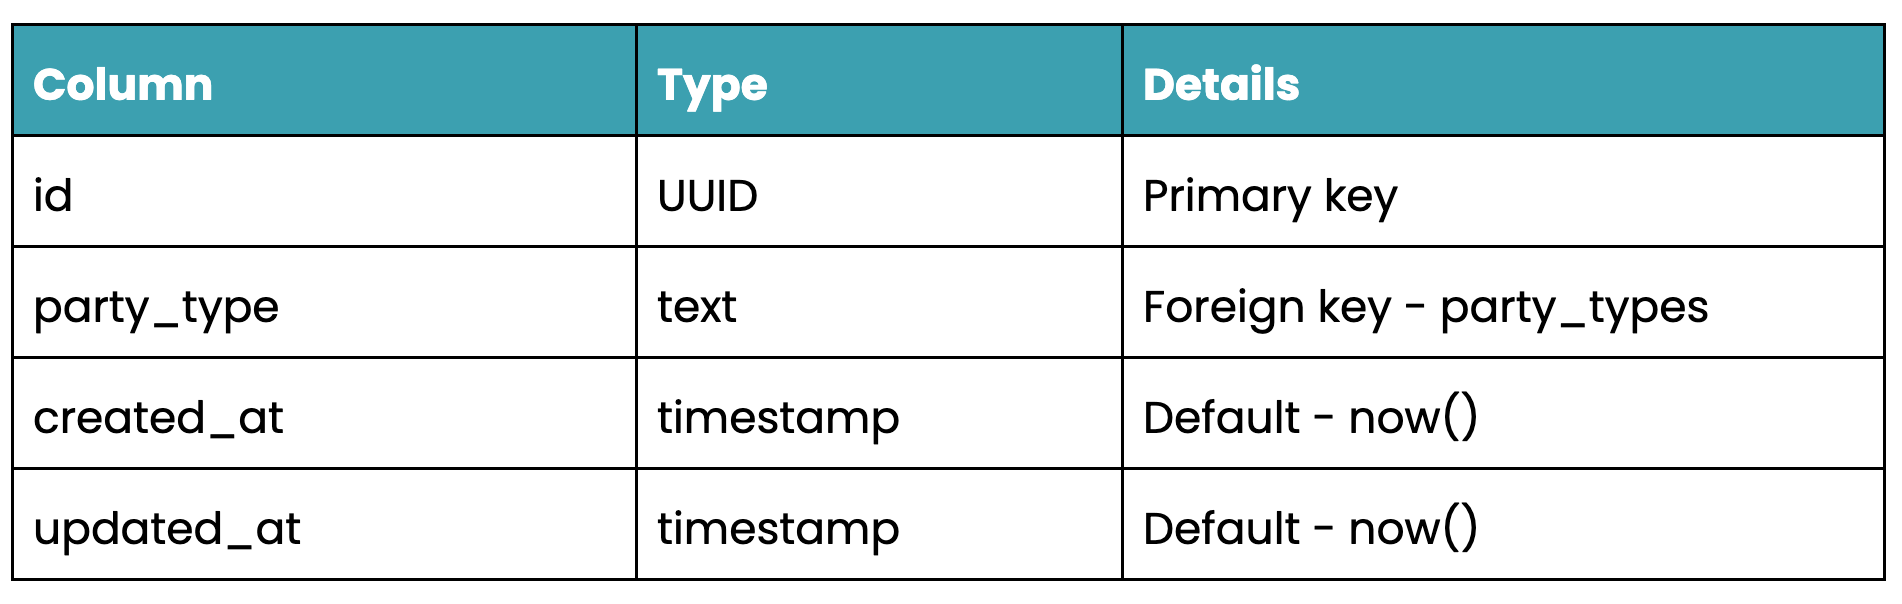
parties table schema
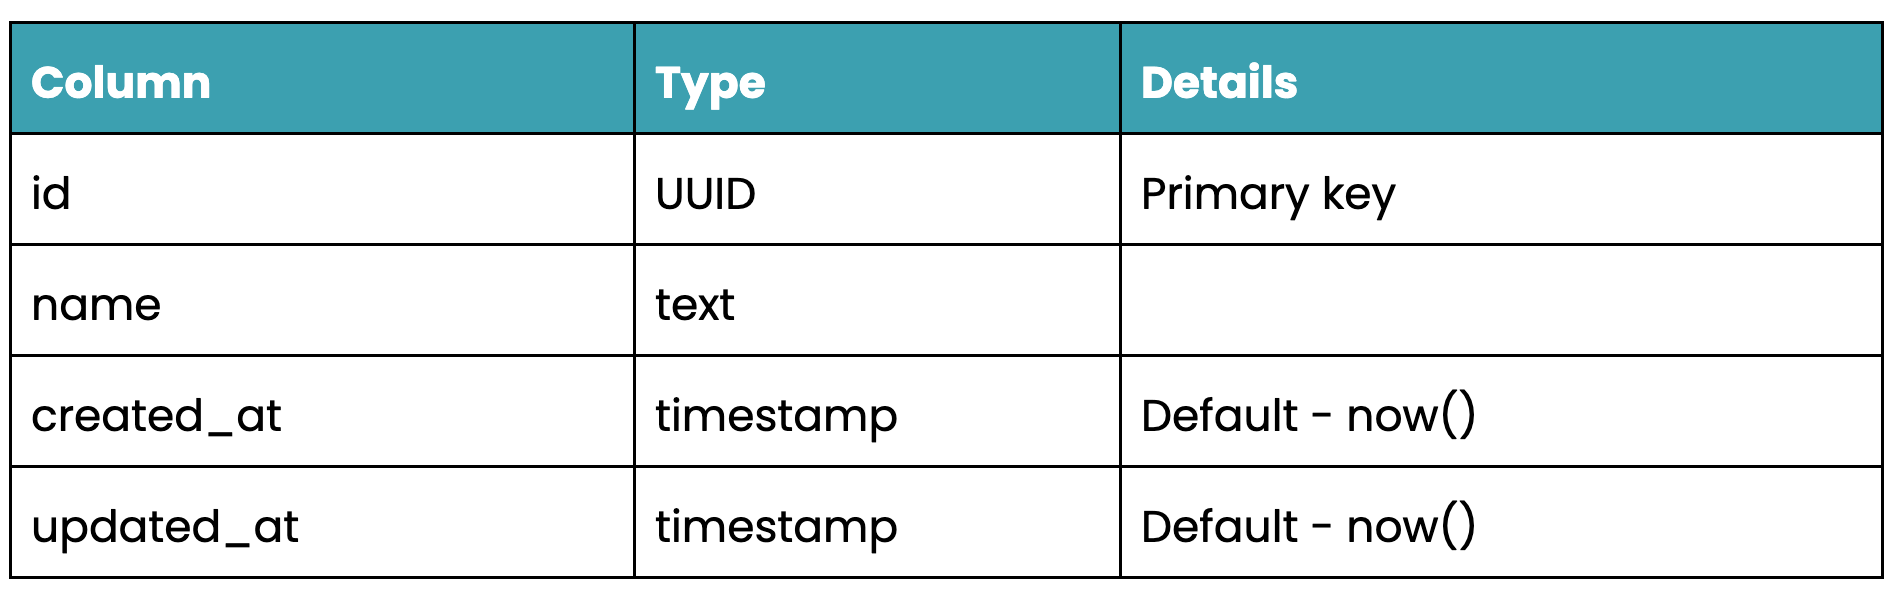
relationship_types table schema
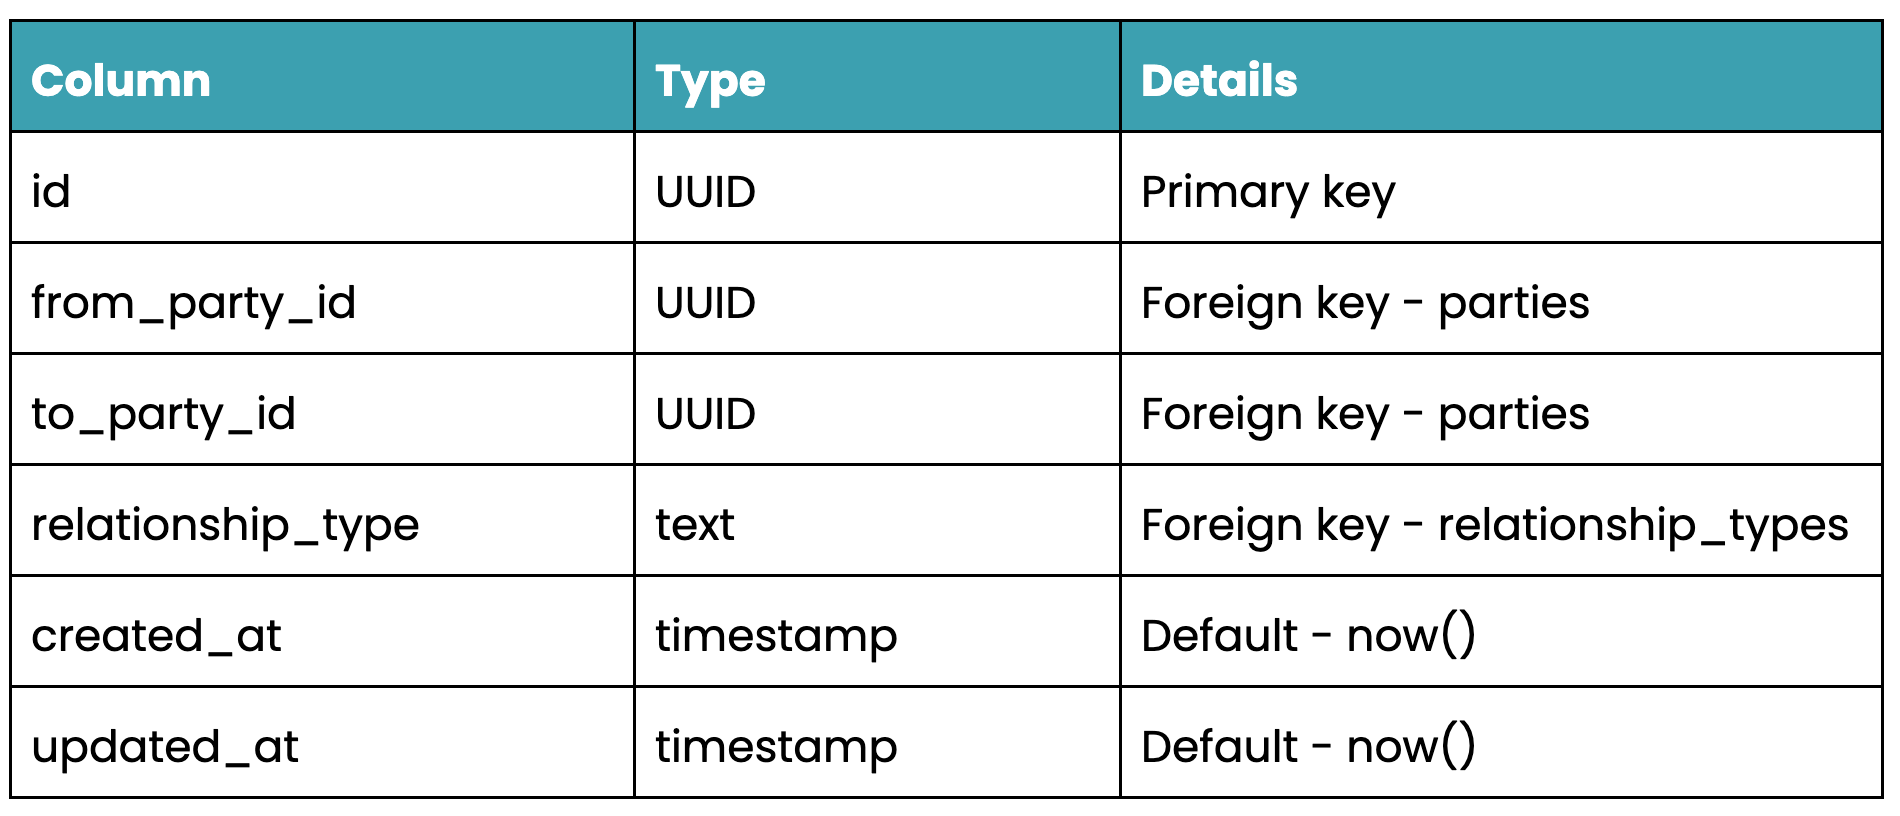
relationships table schema
teams table schema
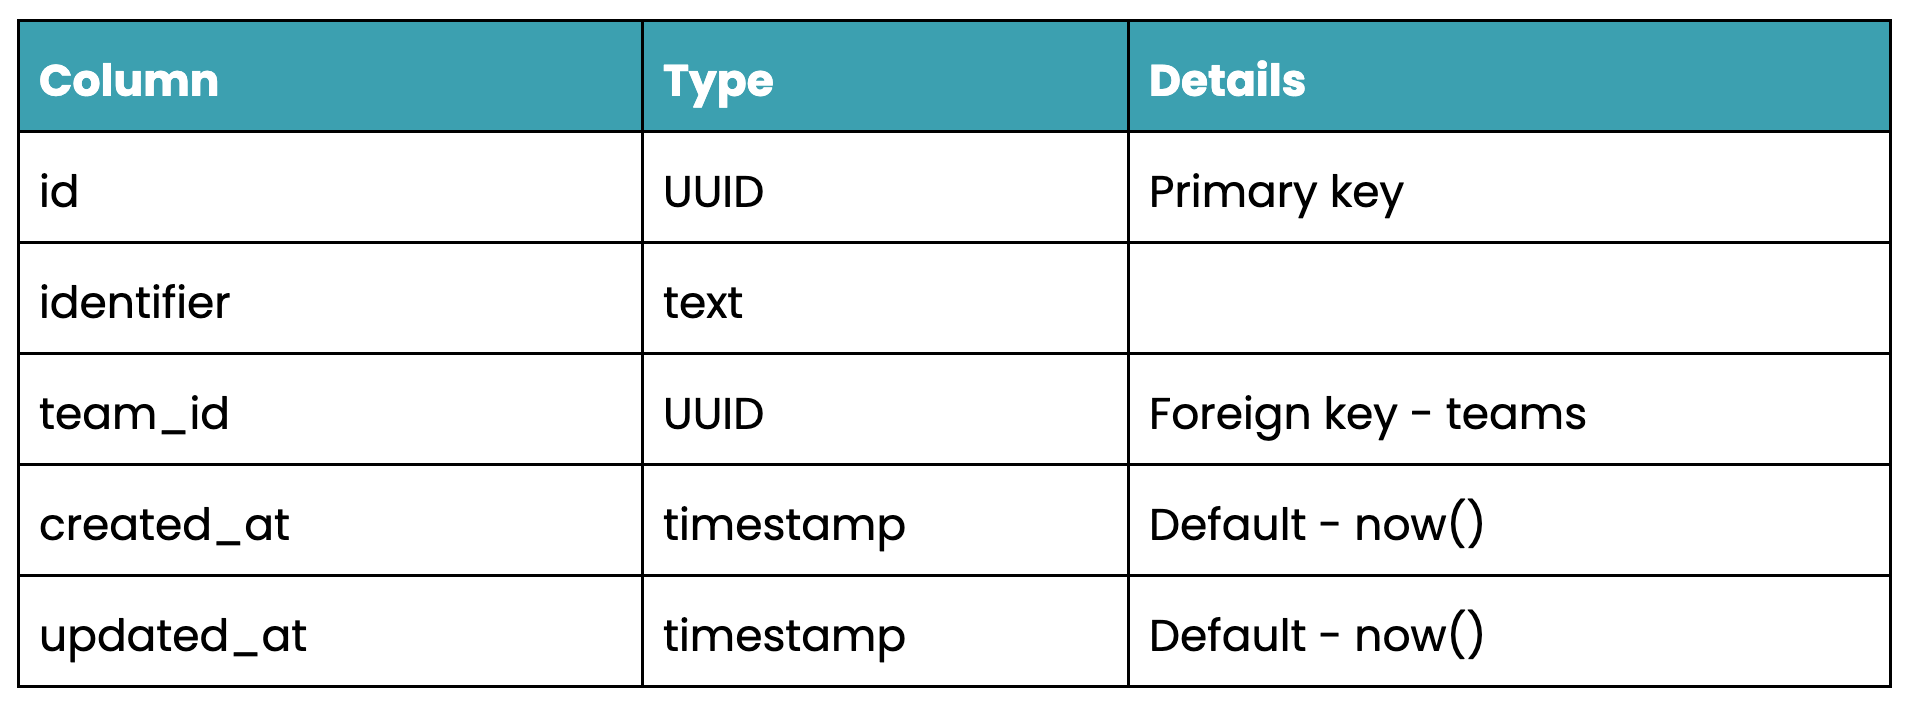
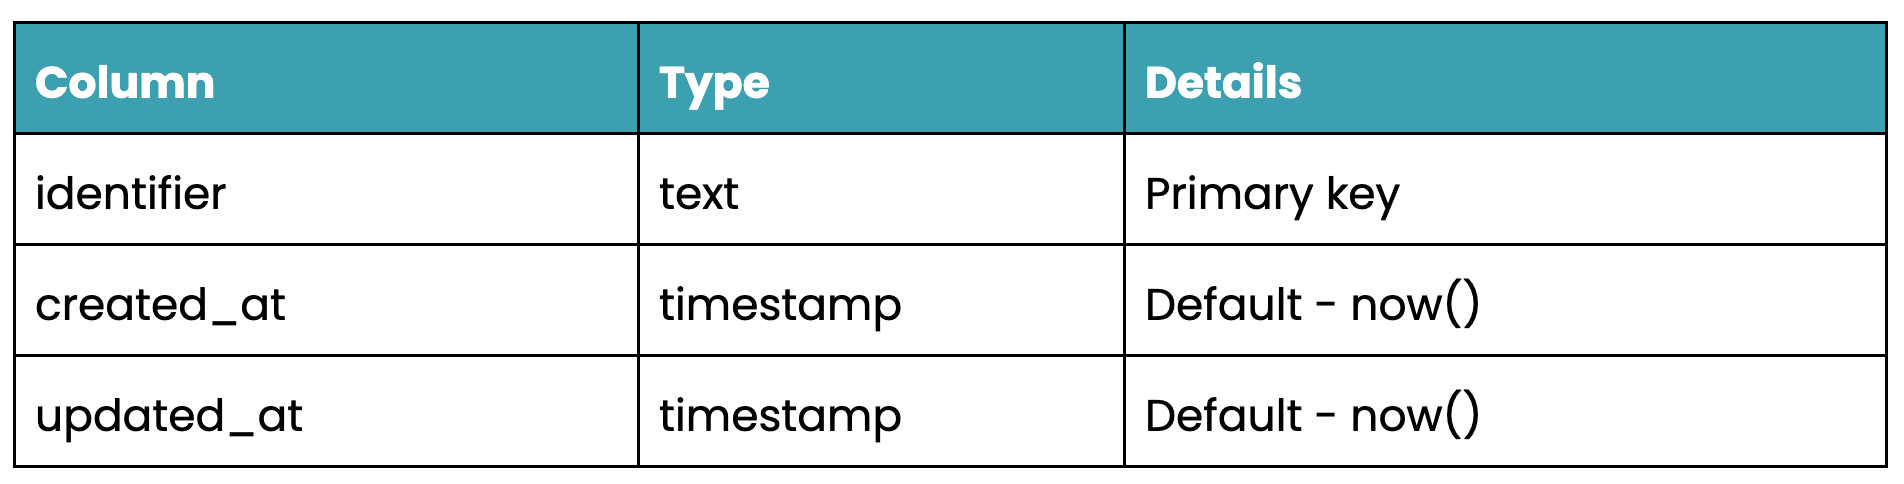
resources table schema
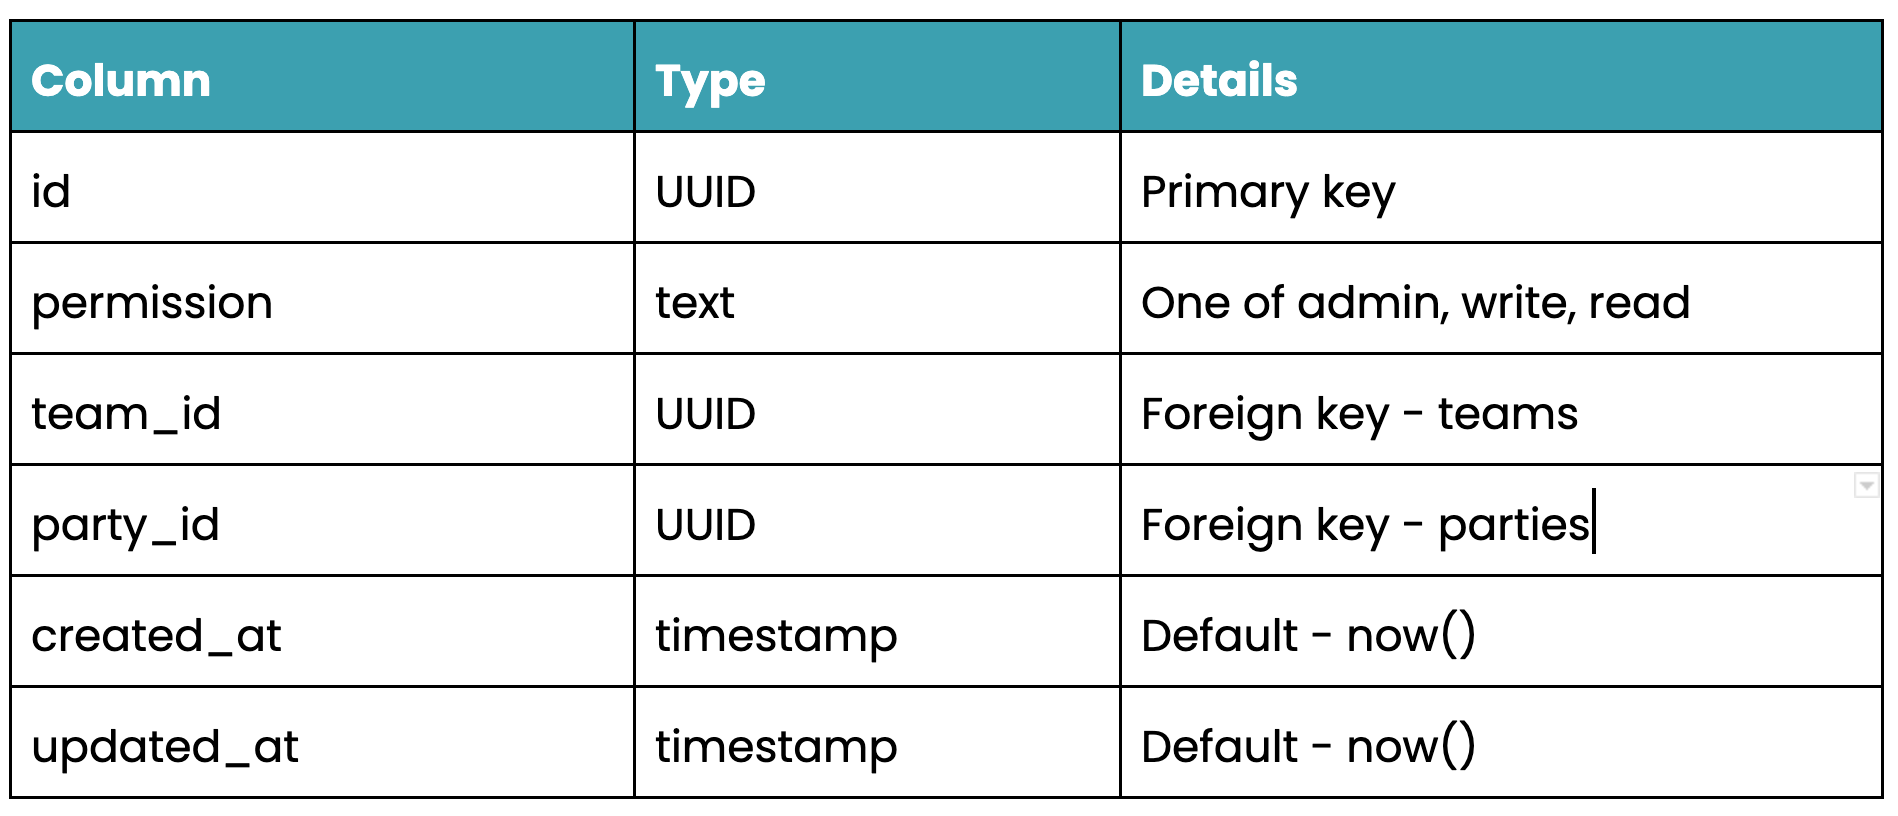
subjects table schema
We can do this easily via the Hasura console (alternatively, you can define migrations using pure SQL using the SQL editor, or the CLI). Here we can specify the columns, types, foreign keys and unique indexes as well as any constraints or computed fields the table may have.
If you’ve chosen to create tables via the console, note how migrations get created as you create tables in the UI.
Note: if you want to skip this step, you can clone our demo repo and apply the migrations and metadata from what we’ve previously defined. To do this - clone the repository, setup/run Hasura and the Postgres instance in Docker and run:
export HASURA_ADMIN_GRAPHQL_SECRET=’mysecretadminkey’
hasura metadata apply # apply our metadata (will result in inconsistencies as we haven’t created our tables)
hasura migrate apply # apply the migrations (will create our tables, constraints, indices)
hasura metadata reload # reload the metadata (hopefully removes any inconsistencies)
Applying the metadata/migrations from configuration
Additionally, if you’re using a Postgres database, you’re able to utilise Postgres views. A Postgres view represents a “virtual” table in the database - built from underlying queries. Hasura lets you build select queries on top of this view meaning you can access data across multiple tables without actually storing a representation of this data. However, if you find that your views are becoming increasingly complex, and are performant to execute, you can use Postgres’ materialized views which will store a representation in the database. Note: it’s important to refresh these materialized views periodically or when the underlying data changes. Read Hasura's documentation for more.
Seeding our data
Now that we’ve set up our tables, we want to set up some test data. Again, Hasura Console comes to the rescue. We can populate our database by creating records for each table.
For this demo, we’ll create the following:
Parties
- Abletech (Organisation)
- Matt/Sam/Marcus (People)
Relationships
- Abletech - Matt/Sam (membership)
- Abletech - Marcus (ownership)
Teams
- Team Abletech (resources: a Github project URL, subjects: Matt/Sam/Marcus)
This data can also be dumped to a seed SQL file by running:
hasura seed create initial_seed_data --from-table parties --from-table party_types --from-table relationship_types --from-table relationships --from-table resources --from-table subjects --from-table teams
Once dumped to a file, others can simply run hasura seed apply and have the same data on their local Hasura instance. This is especially useful for test data and verifying queries/mutations are working as expected.
Again, if you’re wanting to skip this step - you’re able to use the generated seed file in our demo repository and load this into your locally running Hasura instance (assuming you’ve set up the tables from the previous step).
hasura seed apply
Apply the seed data from configuration
Adding and altering our relationships
Now that we’ve created our tables, we want to create relationships between them so that we can really take advantage of GraphQL’s association-based structure. Adding relationships will allow us to access associated data structures via a single query. Note there are two types of relationships, object relationships which represent a one-to-one relationship and array relationships which represent a one-to-many relationship.
Under each table, we want to “track" each table’s foreign key relationships, as well as alter the relationships names so that they’re more representative of what relationships they represent.
Under the parties table we want to create array relationships to the from_party_relationships, to_party_relationships and team_subjects.
Under the relationships table we want to create object relationships to the from_party and the to_party.
Under the resources and subjects tables we want to create object relationships to the team.
Under the teams table we want to create array relationships to the resources and subjects.
Again, if you want to skip this, you’re able to apply the metadata using the instructions from above.
Having a play
Now that we’ve set up our schemas and inserted some dummy data - we can really see what Hasura has to offer!
Under the “APIs'' tab in the console, we’re given a GraphiQL tool. This shows us all the queries/mutations/subscriptions that Hasura has automatically generated for us. We’re able to query our parties, teams, and relationships as well as call mutations to create us some teams and parties. Note that the GraphiQL tool has an X-Hasura-Admin-Secret header, note that this value is populated to the environment specified in our docker-compose file. The presence of this header indicates that we’re accessing our schema with the “admin” role - meaning we have over-arching access to the entire data set and schema.
Here are some example queries that may be useful to you:
Showing a party
This is the simplest query - we're not querying any associations - just fetching a record from the database using its primary key.
query ShowParty {
  parties_by_pk(id: "xxx") {
    email
    id
    name
    party_type
  }
}
Shows a singular party
Showing a team
Slightly more complicated - we're querying our "Teams" table and fetching its associated subjects and resources.
query ShowTeam {
  teams_by_pk(id: "xxx") {
    created_at
    id
    name
    resources {
      id
      identifier
    }
    subjects {
      id
      party {
        id
        created_at
        email
        name
        party_type
        updated_at
      }
      permission
    }
  }
}
Shows a singular team
Inserting a set of teams/resources/subjects
A more complicated mutation - we're inserting several records with this one API call - a team, resource, subject and party.
mutation InsertTeamWithSubjectsAndResource {
  insert_teams_one(object: {name: "Another Abletech Team", resources: {data: {identifier: "some_resource"}}, subjects: {data: {party: {data: {name: "Jeremy Farnault", party_type: "person", email: "jeremy@abletech.co.nz"}}, permission: "admin"}}}) {
    id
    name
    subjects {
      id
      permission
      party {
        id
        email
        name
      }
    }
  }
}
Inserts a set of team, resource, subject and party in one query
As you can see, we’ve managed to expose our entire database via a single GraphQL schema with little to no effort or code. However, as we’ve discussed, we’re accessing this data with an “admin” role - generally not ideal if you’re allowing a client to directly access your data! As a result, we probably want to secure our queries/mutations and data.
Restricting access
With Hasura you can set up authentication using JWT. The JWT must contain x-hasura-default-role and x-hasura-allowed-roles and you can define other optional x-hasura-* claims. We won’t go into authentication in depth in this article, but you can configure your Hasura instance with the same JWT secret as your authentication provider, and set up your authentication provider to create JWTs with the claims defined above. The x-hasura-default-role and x-hasura-* claims will then be available to you when defining permissions. You can read more about JWT authentication in Hasura's documentation.
Permissions are defined on a table level and can be set on a row, on a column or both. They’re granular enough that you can specify if particular roles can perform inserts, updates, selects and deletes. You can also match on values passed through in the JWT claims.
For our Parteams service, let's assume our auth server returns back a JWT containing a x-hasura-default-role of “authenticated” and an x-hasura-user-id which corresponds to a party’s ID in our database.
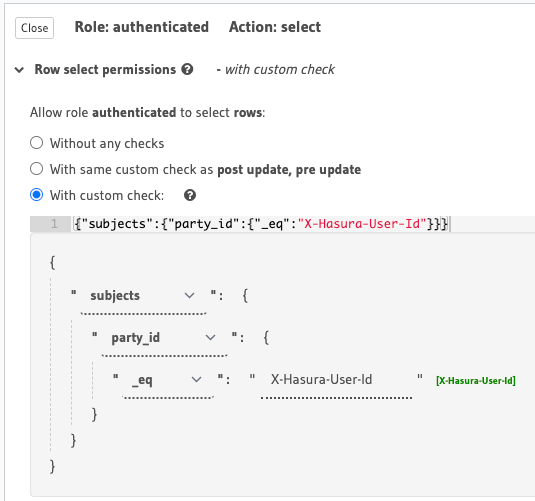
For our parties table, let's assume we only want users with the same party ID as their x-hasura-user-id to be able to select it.
Setting select permissions on the parties table
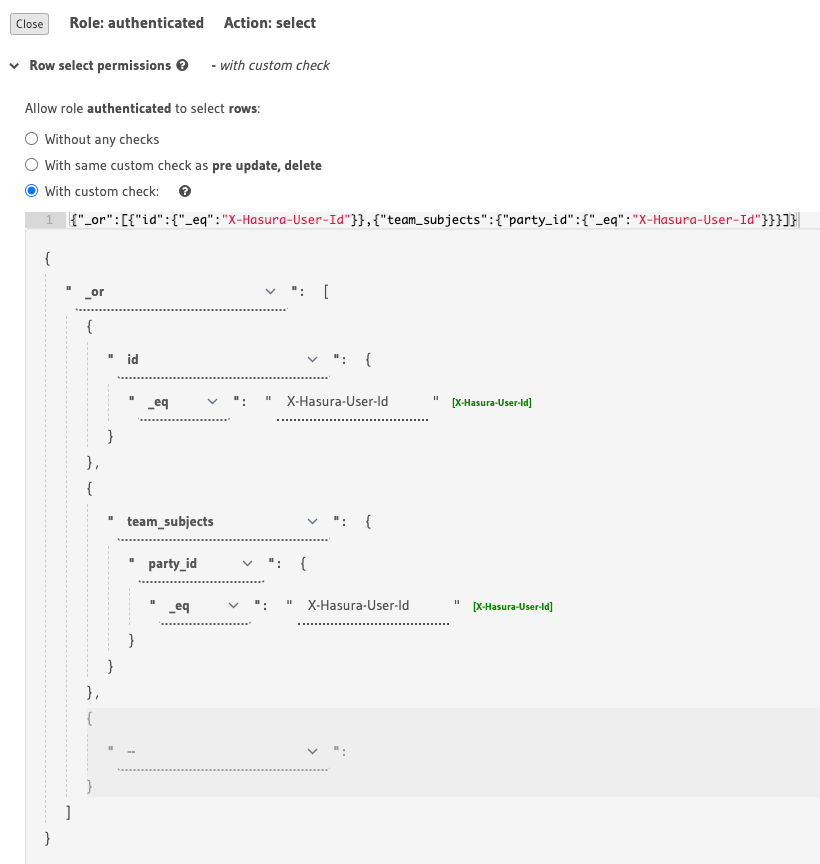
Getting a bit more complicated, we can also create permissions based on associations. For example, say for our teams, we only want users who are a subject in a team to be able to query it. We’re able to look at a team’s subjects and only allow selections if a party_id matches.
Setting select permissions on the teams table
We’re able to also query on updates - say we want to restrict updates to parties so users are only able to their own records we can do this - we can also restrict which columns a user can update. We can also define post-update checks to validate on what users send through.
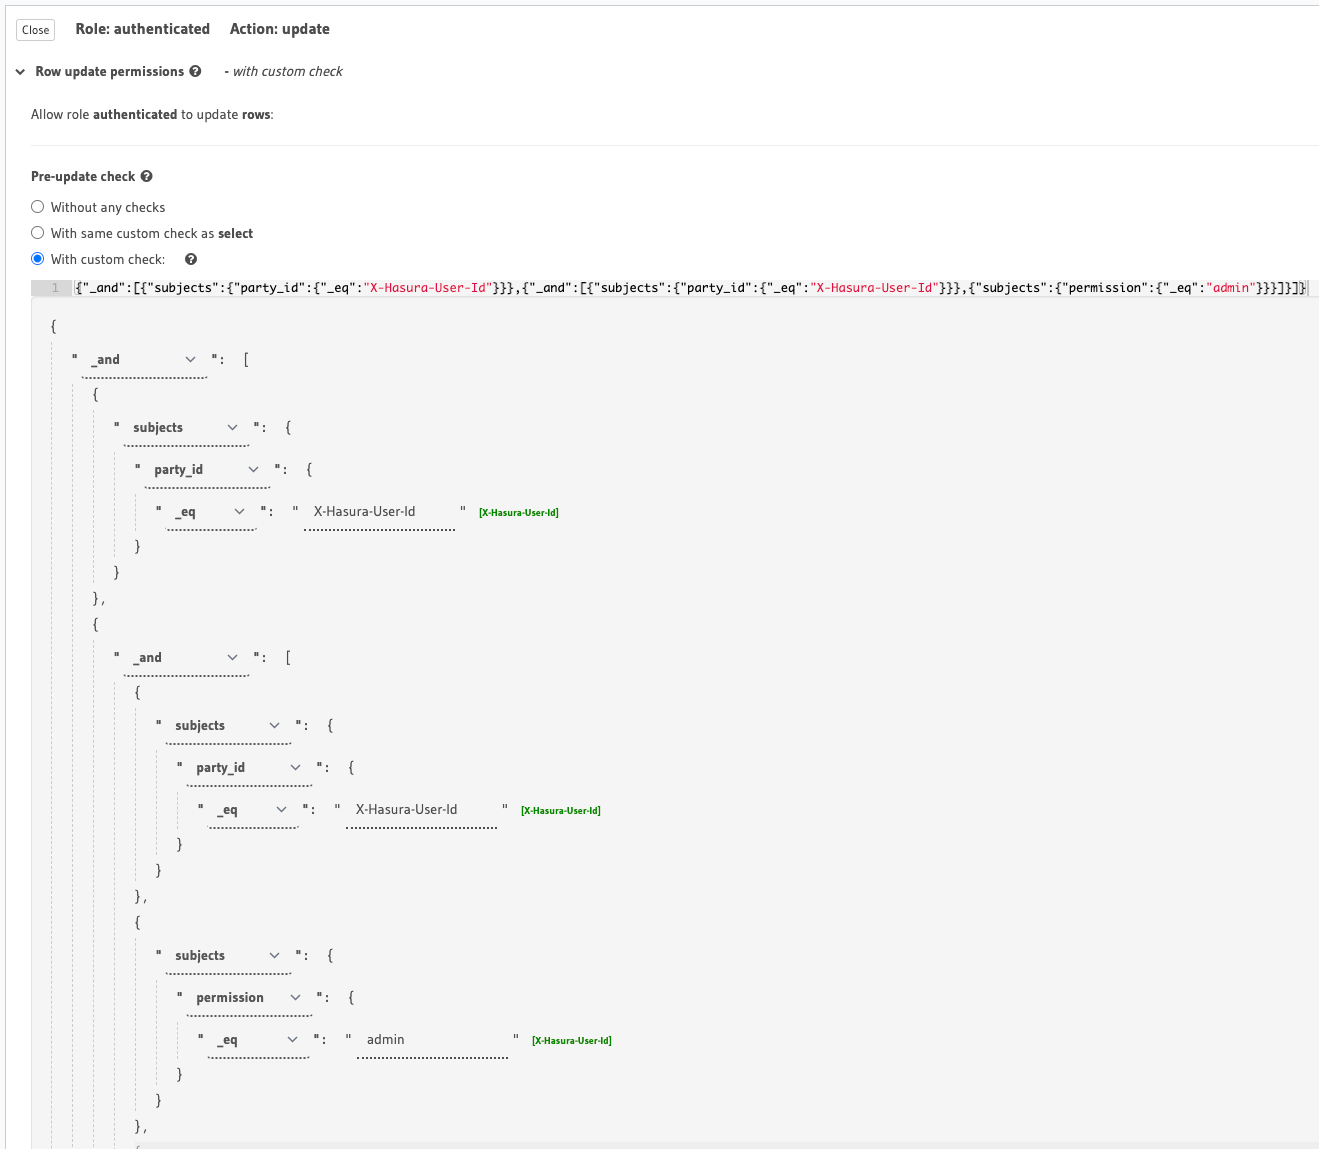
Setting update permissions on the teams table
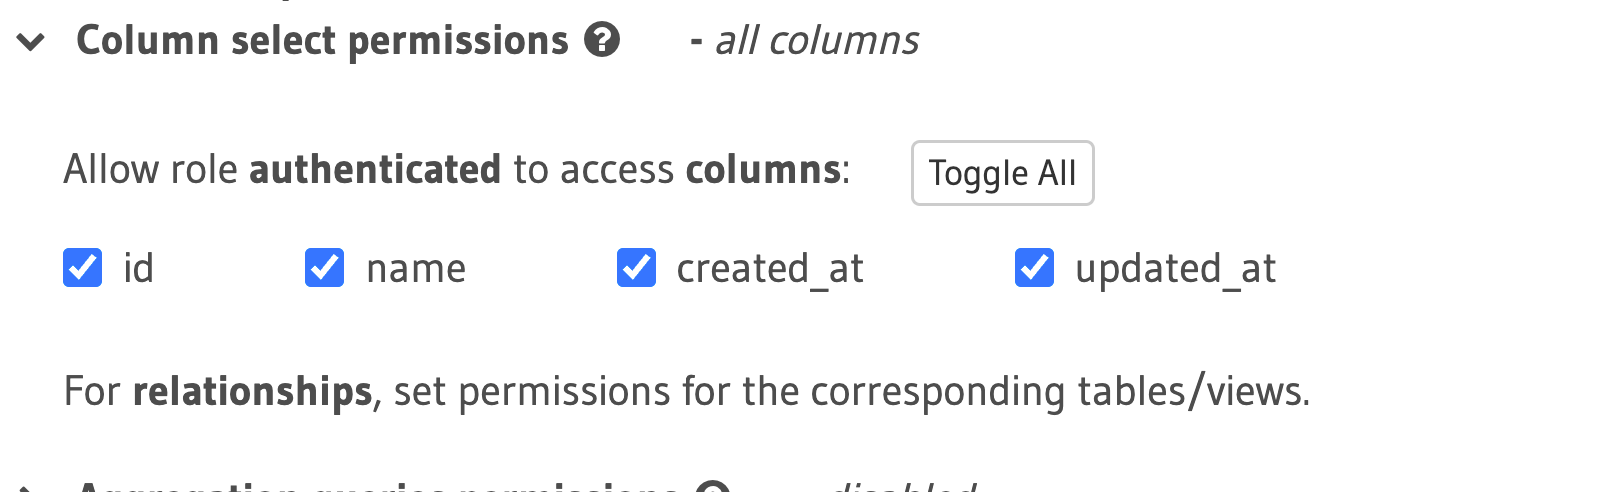
Setting update column permissions on the teams table
Creating actions/computed fields
If you need more information than what’s available in the database, you can enrich your schemas with actions and computed fields.
Actions can be used to add a field onto a schema and instead of resolving from the database you can point the field to an API. Hasura Actions allow you to specify an endpoint, any request headers and transform the payload, request options etc. to match what your API is expecting.
We’ve found backing our actions with a serverless Lambda function has been super useful and will allow you not only to resolve fields, but provide validation and enable business logic to be performed.
It’s important to note that your actions should be restricted so they can only be called by your Hasura instance - one way we’ve adopted is adding a secret to the request header. Alternatively you can lock down your functions and Hasura instance to a secure/restricted VPN.
Computed fields are a way of resolving a field using a custom SQL function. Hasura supports scalar computed fields as well as table computed fields. Although, I would imagine for the majority of use cases - using a Postgres view (for read operations at least) would be simpler and more efficient.
What we liked
Overall, we really liked how fast it was to set up a GraphQL engine and a Hasura instance. Hasura provided a simple interface that let us set up tables, foreign key relationships, permissions and create data - this made it easy to get started and we didn’t even have to write any SQL. However, it was great that if you needed the ability to write more complex SQL queries, you could do so without relying on the interface.
Being able to track/not track various tables and relationships was good too - this meant we could choose what schemas were able to be queried/mutated. Additionally, the flexibility of defining custom relationships (and having the UI provide suggestions for relationships) meant that we could make our schemas as flexible as possible.
The ability to set up permissions on any value and reference relationships (as well as relationships of relationships) was incredibly helpful too. Traditionally, if we wanted to implement permissions - there’d be a lot more boilerplate code that we would need to write. With Hasura, we were able to fetch a value from our JWT’s claims and compare this against values in our database.
Lastly, being able to enrich your GraphQL schemas utilising additional sources provides great flexibility. Using Hasura’s Actions to provide validation, or to resolve other fields as well as computed fields to hook into SQL functions make for an extensible and dynamic schema.
What we'd like to see in future
It was great that we could create root queries/mutations to resolve with actions, however it would be awesome to be able to resolve individual fields on existing types with actions. For example, if I had a type “User” that was resolved from a “users” table in our linked database but wanted to resolve a field on the “User” type from an external API. This may be possible with computed fields, or a remote schema but enriching this data from an action would enhance usability.
Tests are something we would like to have documentation on or assistance with in the future. Being a Rails/Elixir/JS shop, Abletech has a strong background in test-driven development. This is a bit trickier to implement with Hasura. Our unguided approach would be to stand up a separate testing application for integration tests against the GraphQL engine and configuration with some seed test data. Some guidelines of testing best practices from Hasura would be an added bonus.
Next steps
In terms of next steps for this demo app - we would be keen to implement more remote data sources - either in the form of remote schemas or events. Remote schemas would allow us to “schema stitch” another GraphQL schema to the one exposed by Hasura whereas events would allow us to trigger custom business logic after data is modified.
Additionally, Hasura provides REST endpoints. These are particularly useful if you have clients that aren’t accustomed to (or simply don’t want to) consume the GraphQL endpoints. A next step here, could be to expose a selection of queries/mutations as RESTful endpoints to test functionality.
TL;DR
Hasura is a super powerful tool that you’re able to place in front of your database. It exposes a GraphQL schema with a whole heap of useful queries, mutations and subscriptions and reduces your time to market immensely. It has rich permission management and the ability to hook up external APIs using Actions and trigger APIs using Events.
The source code used for this demo can be found on the Abletech Github.
Get in touch today if you want a hosted solution built tailored to your needs that utilises Hasura or GraphQL.