The guide to integrating Google MyMaps onto your website with React
A step-by-step guide to putting your custom map onto your website
If you want to put the custom map you’ve created with MyMaps onto a website you have two options:
-
Simple — Embed it
-
Advanced — Use the Maps Javascript API
This article will go over how to do the latter.
Why read this?
-
It allows you to update your map on one service (Google MyMaps) and your website will automatically update to reflect these changes. 0 code changes required. In a client/developer partnership, often we want to give the client total control over their content, this does exactly that. You just provide the implementation.
-
Many solutions online stated you need a web server to host your KML layer files. I found a way in which you don’t, lowering the expertise required to get this working.
-
A lot of the implementation information online is contradictory and confusing. As a result, I thought it’d be nice to have a guide that made it as easy as 1,2,3.
So, follow along to find out more!
Precursor: We will be using React’s no-build app configuration — create-react-app and the ‘react-google-maps’ library which wraps the Google Maps Javascript API. As a result, you will need to have, or create, a Google Maps API Key. You can do this here.
A technical overview
I’ve been working on a project at Abletech, a software development company, that is very good at creating geospatial solutions. A client wanted their custom map to be integrated into their website.
This integration uses a feature provided by Google MyMaps that allows you to export the maps to a ‘NetworkLinked’ KML or KMZ file.
KML or Keyhole Markup Language is a form of XML for expressing geographic data. KMZ is a KML zipped.
Hidden inside this KML file is a link that points to the maps dataset. We can use this with some other tricks to get our data to seamlessly update without you having to touch a single line of code, neat eh?
The only drawback is that Google caches the data of your map. When I tested this at the end of 2018, it would update the data in about an hour. At the beginning of 2019, about 10 minutes. The conclusion? Data refresh rates vary and you can’t control it. Unfortunately, setting cache expiry headers don’t affect it. Therefore if you need automatic, live updates, then this solution may not be for you.
Let’s begin!
To begin, we need a custom map created in MyMaps. If you would like to create your own, go here to do so. I’d recommend you do this to prove to yourself that the data is updating. However, for the purposes of this tutorial, I will be using the community created ShipWrecks map. This map is a living documentation of many of the shipwrecks that have been found all over the world.
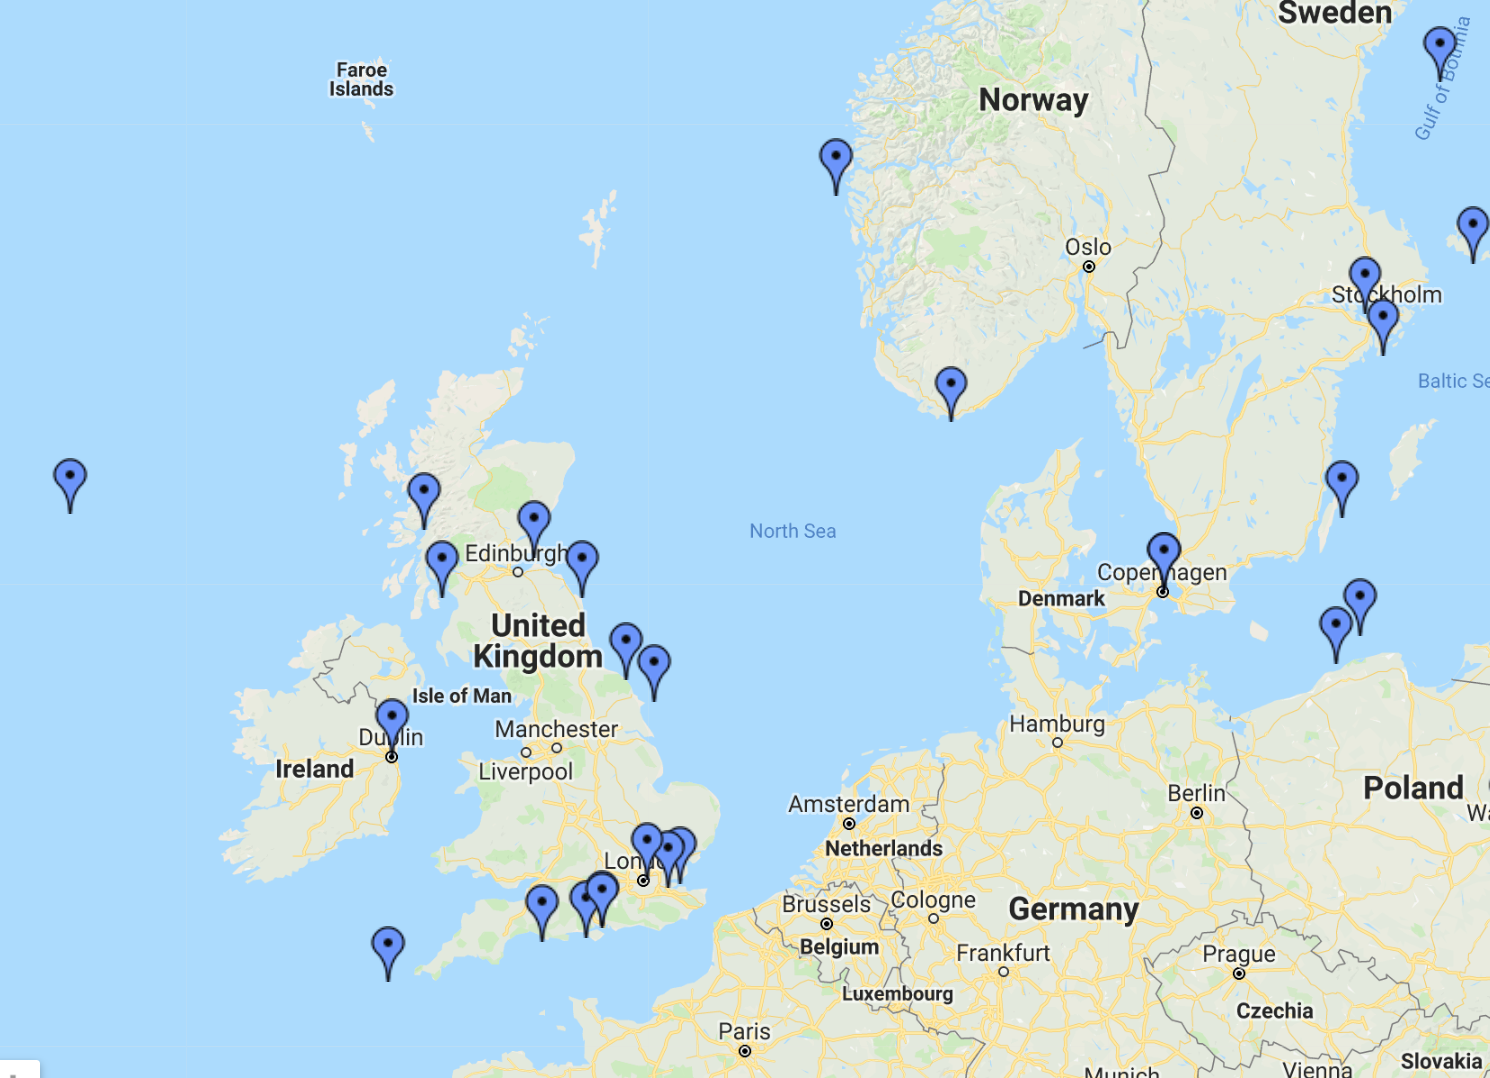
Reported Shipwrecks around Europe
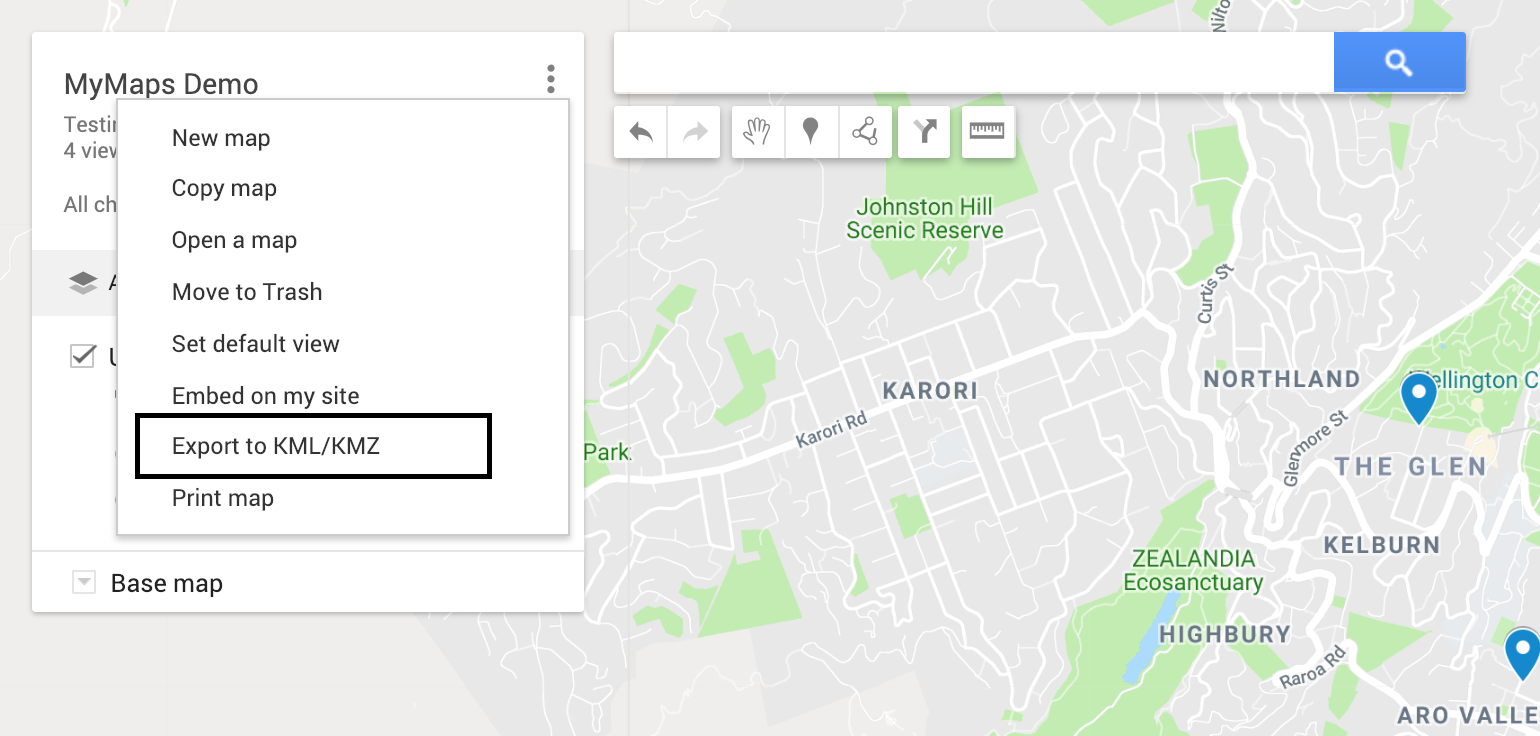
Step One: Obtaining the KMZ file
The first step in integrating MyMaps with your website is to download the KML/KMZ version of the map. If you’re using the Shipwrecks map and following along, go to this LINK, click the hamburger button and then ‘Download KML’.
If you have created your own MyMap, similarly, click the hamburger icon next to your map’s title (as below)
Irrespective of map choice, you will get the following popup.
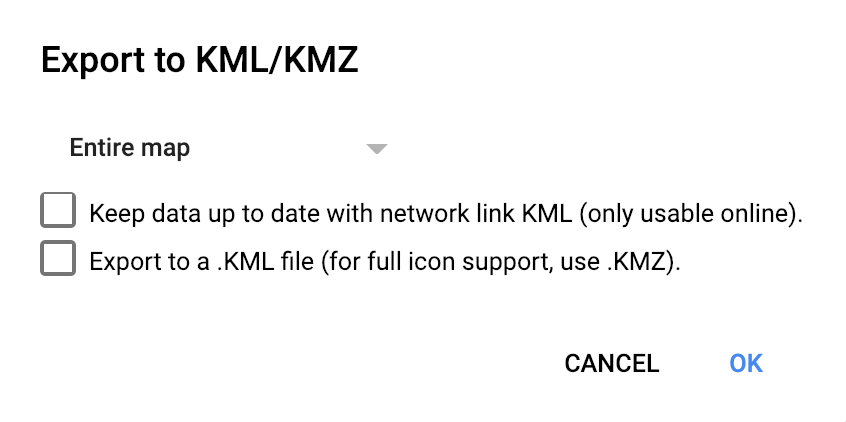
Even if you haven’t used custom markers on your MyMap you **MUST NOT **select the ‘Export to a .KML file’ button as the map’s data will not load.
You MUST select ‘Keep data up to date with network link KML’. By having this option selected, it will allow for automatic data updates.
Step Two: Extracting the correct KML file
You have downloaded a NetworkLinked KMZ file in step one. We need to get the URL that links to the Maps dataset. This is a little hidden. Here’s how to get it:
-
Rename the extension from KMZ to ZIP and then unzip it.
-
You should note that a KML file will have been extracted. If you open this file with a text editor it should look something like this:
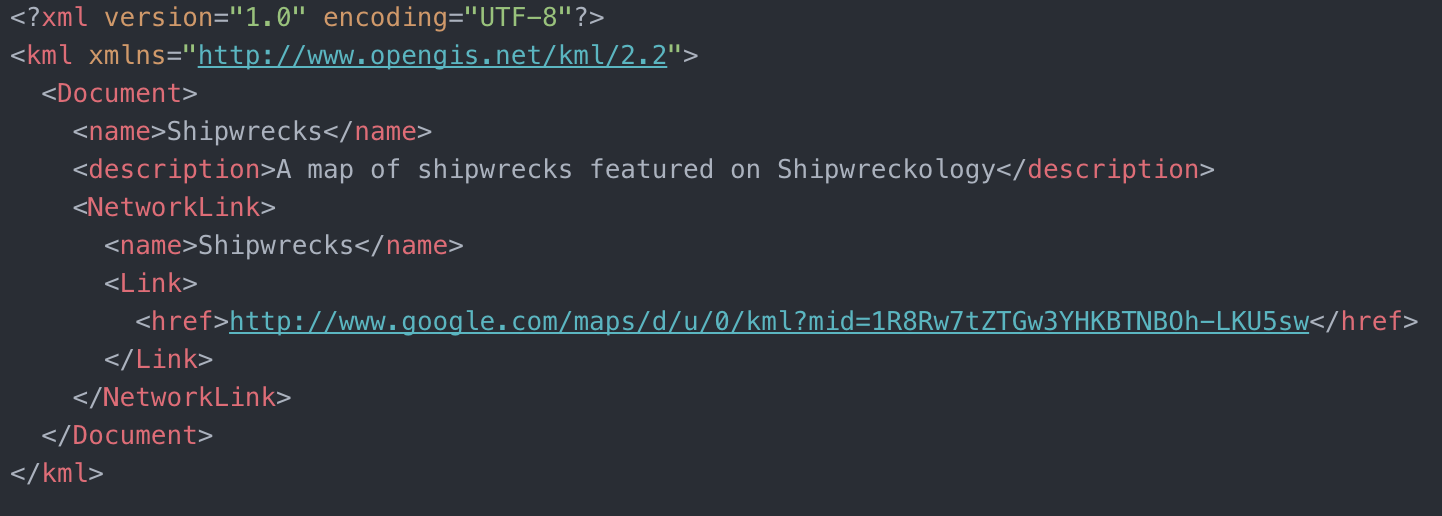
Networklinked KML File
- You will note there is a <href> tag and inside that, a URL. This is the URL to the dataset of your map. Copy this URL to your clipboard. We will be using it in Step 3.
Note: Feel free to put this link into your browser. If you do, it will download another KMZ file that you will need to rename to a ZIP file and unzip. Once unzipped, open the doc.kml file that unzipped and you will note the data in this file reflects the up to date data on your map. Below is an example of what some of the Shipwrecks data looks like.
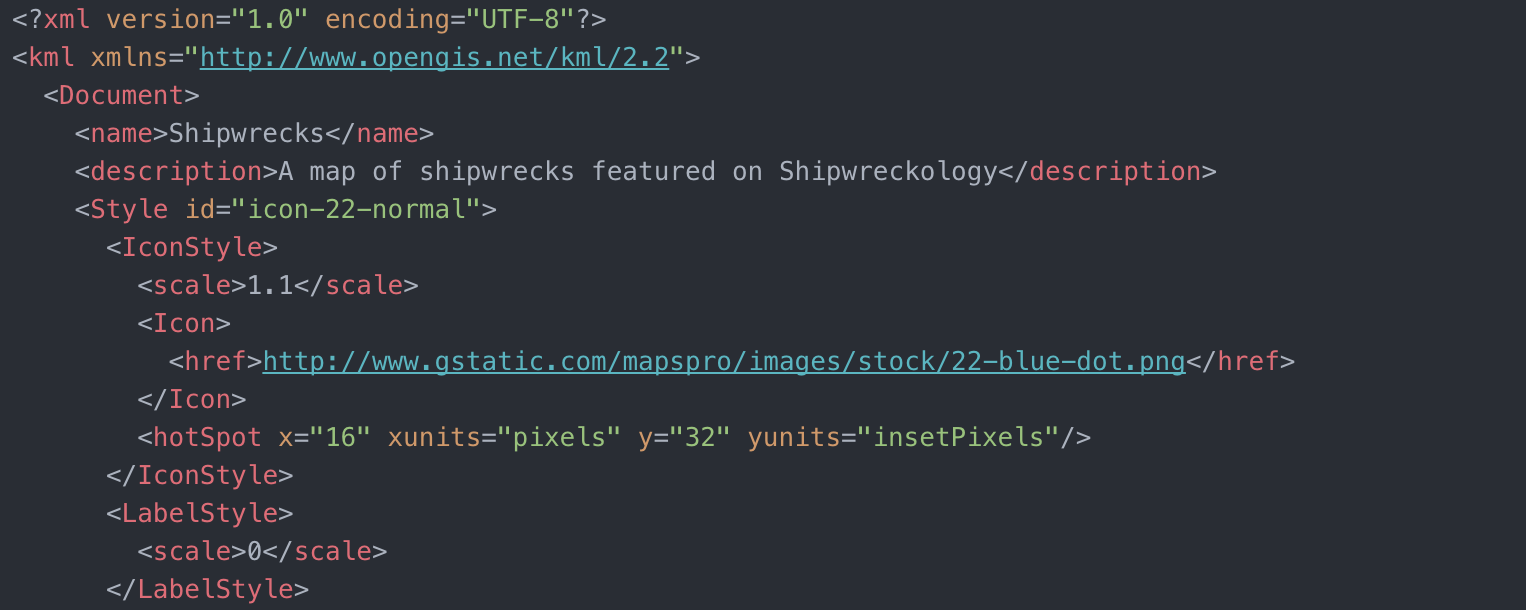
Shipwrecks Map Data in containing KML file
Great, we have that link on our clipboard, we’re finally ready to do some coding!
Step Three: Google Maps API Integration
For this section, I’m going to make the assumption you have a blank slate of Create-React-App installed. Next step: install the react-google-maps library which wraps the Google Maps Javascript API.
npm install react-google-maps
Once completed, open up that directory in your code editor of choice. In your src/ directory you will have an App.js file with some template rendering. Remove this so your App.js looks like this:
import React, { Component } from ‘react’;
import ‘./App.css’;

class App extends Component {
  render() {
    return (
      null
    );
  }
}
export default App;
Next, create a folder called ‘components’ in the /src folder and another folder inside the components folder called ‘Map’. Inside this Map folder, create two files called ‘index.js’ and ‘Map.js’
Paste the following code into your index.js file.
export { default } from ‘./Map’
Your Map.js file needs a basic structure, let’s make it return the age-old classic Hello World.
import React, { Component } from ‘react’;

const Map = () => {
 return (
  <h1>Hello World</h1>
 )
}

export default Map
Your App.js needs to render this ‘Map’, modify your App.js to look like this:
import React, { Component } from 'react';
import './App.css';

import Map from './components/Map'

class App extends Component {
  render() {
    return (
      <Map/>
    );
  }
}
export default App;
Great, you now have something showing. If you’re following along using the Shipwrecks example map, copy this entire code block into your Map.js file.
import React, { Component } from 'react';
import { compose, withProps } from "recompose"
const {
  withScriptjs,
  withGoogleMap,
  GoogleMap,
  KmlLayer,
} = require("react-google-maps");

const Map = compose(
  withProps({
    googleMapURL: "https://maps.googleapis.com/maps/api/js?key=YOUR_GOOGLE_API_KEY_HERE",
    loadingElement: <div style={{ height: `100%` }} />,
    containerElement: <div style={{ height: `100vh` }} />,
    mapElement: <div style={{ height: `100%` }} />,
  }),
  withScriptjs,
  withGoogleMap
)(props =>
  <GoogleMap
    defaultZoom={2}
    defaultCenter={{ lat: 40.23164130704827, lng: 15.088623999999982 }}
    mapTypeId= {"terrain"}
  >
    <KmlLayer
      url={"http://www.google.com/maps/d/u/0/kml?mid=1R8Rw7tZTGw3YHKBTNBOh-LKU5sw" + "&ver=" + generateRandom()}
      options={{ preserveViewport: true }}
    />
  </GoogleMap>
);

function generateRandom() {
  return Math.random() * 10000000000000000
}
export default Map
If you’re not using the shipwrecks file, copy the block of code anyway. You will just need to make 1 modification to make it work.
- Replace the URL that looks like
http://www.google.com/maps/d/u/0/kml?mid=1R8Rw7tZTGw3YHKBTNBOh-LKU5sw*with the URL I got you to copy in step two. Please make sure the ‘&ver=’ + generateRandom() has not been removed.
Awesome, now you will need to put in your Google Maps enabled API key. You can retrieve this from the Google Cloud Console. Once you have this, you can replace the text that says YOUR_GOOGLE_API_KEY_HERE with your key.
Now all you need to do is alter your terrain type by changing ‘*mapTypeId= {“terrain”}’ *to another type, or just remove it. You will likely also need to change your latitude, longitude and zoom levels to best fit your data. Here’s a trick for doing this:
Go to the Shipwrecks MyMap here or to your own map and look at the end of the URL you will see your latitude, longitude and zoom levels. If you move your map around you will see these values update too! Hence, an easy way to get the perfect zoom and latitude/longitude values for your map.

What this code does:
This code uses the React Google Maps library to create a Map that then, adds the KML map data layer on top of it and displays it for you. It displays the map to 100% width and height of your containing div. In this example, this being the entire webpage.
A side note, the wise-eyed among you might have noticed the generateRandom() function appended to the end of the KmlLayer URL. This function is used for generating a cache-busting parameter. Simply, Google caches your data. This works by their servers saying ‘hey, have we received this URL in the last X amount of time? If so, send back the unchanged data instead of this new up to date data we have because it saves us time and resources in making duplicate queries that happen close together.
Adding a ‘?ver = RandomNumberHere’ parameter on the end of the URL means that the URL will be different every time (assuming the same number isn’t generated twice). Thus, when their servers check to see if they have seen this URL before, they haven’t, and thus, returns the up to date data. Without this function, I was not able to get the website to update seamlessly with the changes on Google MyMaps, so it’s imperative that you use this.
Other than this, all done! I hope this guide was clear enough. Feel free to ask any questions if you have any!